A load balancer comprises of software components that provide for balancing IP traffic across a set of real servers.
HAProxy
High Availability Proxy performs proxy, load balancing and high availability services to TCP and HTTP based applications. It is able to process multiple events on thousands of connections across a pool of servers acting as one virtual server.
Keepalived
This is a daemon used to monitor services and to automatically failover tasks on the active and passive routers. Running on both active and passive Linux Virtual Server (LVS) routers, they use the Virtual Redundancy Routing Protocol (VRRP).
How VRRP Works
At first, the active router sends periodic advertisements to the passive routers. On the passive routers, the VRRP instance determines the running status of the active router.
If the active routers fail to advertise after a certain interval, keepalived initiates failover. In this period, the virtual servers are cleared and a new active router takes control of the virtual IP, begins health checks and starts sending VRRP advertisements.
Using HAProxy and Keepalived
High availability infrastructure is a necessity for many system designs world wide and therefore we are going to see how combining HAProxy and keepalived is one of the best solutions to maintaining highly available systems.
Requirements
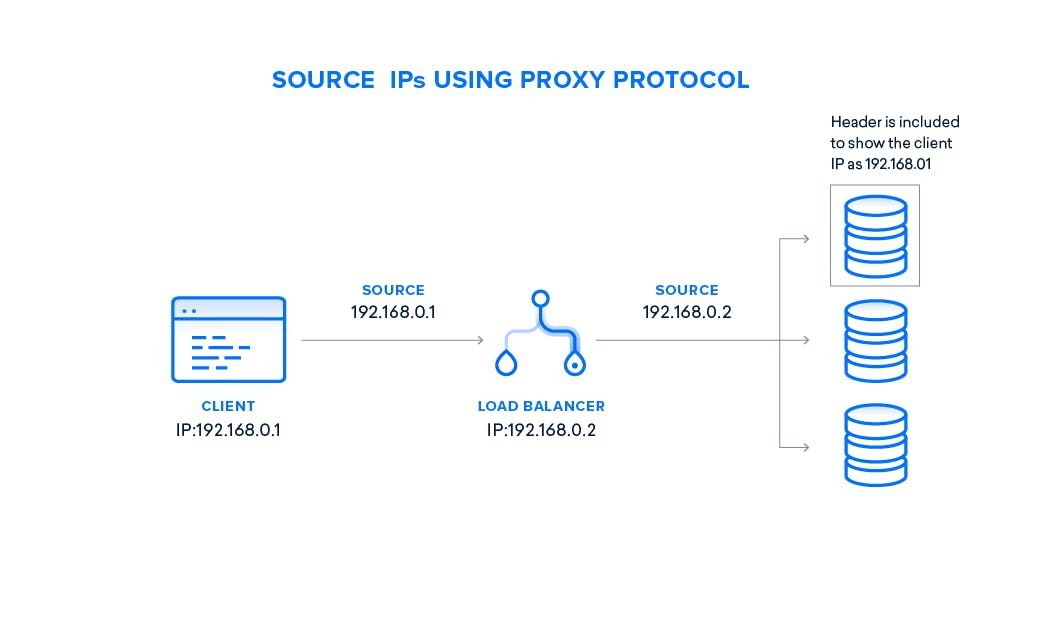
This guide will be based on DigitalOcean resources in order to have a similar architecture with the image above. Within a private network, you will need the following to configure this setup:
- Two Ubuntu NGINX web servers' private IP addresses
- Two load balancers' private and anchor IP addresses
- One floating IP address
In order to obtain private or anchor IP addresses, use the Digital Ocean metadata API to curl the endpoint on a specific server or load balancer.
The web servers should be identical to avoid inconsistencies as the traffic will be distributed even when new web servers are required.
Restrict Servers to Allow Requests Only From the Load Balancers
First, we will allow NGINX to only listen for requests on private IP addresses. Then lastly serve requests coming from the private IP addresses of the load balancers.
Using a non-root sudo user, open the default server block of both web servers:
sudo vi /etc/nginx/sites-available/defaultModify the listen directive to listen to it's own private IP address only and nothing else:
server {
    listen current-server-private-IP-address:80;

    #...
}
To allow requests only from the load balancers, we will use the allow directive, then the deny directive to prevent all others:
server {
    listen current-server-private-IP-address:80;

    allow load-balancer1-private-IP-address;
    allow load-balancer2-private-IP-address;
    deny all;
}
Save changes and restart the web servers:
sudo service nginx restartConfiguring HAProxy
Now we will need the load balancers to use HAProxy in order to split requests between the web servers. The configuration will allow the load balancers to listen for requests on their anchor IP addresses, because this is the IP address that the floating IP will bind to when attached to a droplet.
This gives us confidence to know that only traffic from the floating IP will be forwarded. Now install HAProxy using:
sudo apt-get update && sudo apt-get install haproxyFirst, we need to modify the /etc/default/haproxy file to enable the init script to start haproxy
# Set ENABLED to 1 if you want the init script to start haproxy.
ENABLED=1
#...
Save and close, then next we update the HAProxy config file:
sudo vi /etc/haproxy/haproxy.cfgOtherwise if you downloaded the enterprise version, the config file will be at /etc/hapee-1.8/hapee-lb.cfg. This file comprises of 4 important sections: global, defaults, frontend and backend.
Each of these have an important role in deciding how the proxy server as a whole will work. Inside the defaults section, in order to configure layer 4 (TCP) load balancing, we are going to change the mode and option as follows:
defaults
    mode tcp
    option httplog
The mode section value is either http or tcp, which operates at the faster, but less-aware, level. The option section is either httplog or tcplog. You will prefer httplog over tcplog because when HAProxy encounters a frontend with mode tcp, it will emit a warning and downgrade it to option tcplog.
Next we will define the frontend section. This section defines the IP addresses and ports that clients can connect to. You may add as many frontend sections as needed for exposing various websites.
Each frontend keyword is followed by a label, for example www.example.com, to differentiate it from others.
frontend www.example.com
    bind load-balancer-anchor-IP-address:80
    bind load-balancer-anchor-IP-address:443 ssl crt /etc/ssl/certs/example.pem
    http-request redirect scheme https unless { ssl_fc }
    use_backend api_servers if { path_beg /api/ }
    default_backend web_servers
The bind setting will bind HAProxy to the load balancer's anchor IP which allows listening for traffic originating from the floating IP.
If you don't have SSL certificates for the web server (example.com) you can skip the next bind setting that listens for HTTPS traffic. Usually you will setup SSL certificates by SSL termination or SSL pass-through and not directly on the web servers.
The http-request redirect setting forces the client to use a different URL, for the example above, using a HTTPS scheme instead of HTTP.
A use_backend setting chooses a specific backend pool to respond to if a certain condition is true. So if you are going to have just one backend pool, you won't need to use this setting to separate them.
Lastly, the default_backend will specify a backend pool to send traffic to. This is required for all frontends especially if the use_backend setting is also not used.
Now we may finish by setting the backend:
backend web_servers
    balance roundrobin
    default-server check maxconn 20
    server server1 web-server1-private-IP-address:80
    server server2 web-server2-private-IP-address:80
A balance setting dictates how HAProxy selects a server to respond to requests. roundrobin algorithm selects the next server in the list while leastconn selects a server with the least active connections. Other algorithms include url_param, hdr, rdp-cookie, static-rr, source and uri
Now the most important setting of the backend pool, the server setting. Here are some important features:
- It's first argument is a name, followed by the IP address (or domain name) and port of the backend
- To setup HTTP-based health checking of the servers, each server must opt in health checks by using the
checkargument. In our case we have predefined it in thedefault_serverto avoid duplication. - Lastly, every server must have a
maxconnsetting that limits the number of concurrent requests for a server. Having a value for this setting avoids saturating your servers with requests and gives a standard to prepare for scaling in the future.
Save and close the configuration file, use the command below to test the syntax of the configuration:
sudo haproxy -f -c /etc/haproxy/haproxy.cfgWith no errors, you can safely restart HAProxy:
sudo service haproxy restartInstalling Keepalived
As our load balancers are working as we expected, we are lacking the high availability aspect between the load balancers. Using the daemon we can detect load balancer failovers and change to a passive/backup router.
Keepalived can be installed from the Ubuntu repositories or compiled from the source, and we are going to use the later. For this installation we require build-essential to get compilation tools and libssl-dev to obtain the SSL development libraries.
sudo apt-get install build-essential libssl-dev
Next, we can download the source. At the time of writing this post, the latest version is v2.2.2. Head over here to see the latest version you can download to the home directory:
wget http://www.keepalived.org/software/keepalived-2.2.2.tar.gz
Expand the downloaded archive and move into the directory:
tar xzvf keepalived* && cd keepalived*Build the files:
./configure && makeInstall the keepalived daemon:
sudo make installKeepalived Init Script
To handle the keepalived service we will create an initializing script inside the /etc/init directory:
sudo vi /etc/init/keepalived.confWe are going to describe the description:
description "Initialize load balancer failover daemon"Next we define the runlevels on when the service should start and stop. First it should start in normal conditions (runlevels 2 to 5) and stopped for all other levels:
description "Initialize load balancer failover daemon"

start on runlevel [2345]
stop on runlevel [!2345]
To ensure the service restarts in the event of a failure, we specify an exec to the path of the keepalived execution file. Then finally add a dont-fork flag so that the script can track the pid correctly.
description "Initialize load balancer failover daemon"

start on runlevel [2345]
stop on runlevel [!2345]

respawn

exec /usr/local/sbin/keepalived --dont-fork
Save and exit the script, now we edit the config file.
Keepalived Configuration
Both load balancers need to have a config file in the /etc/keepalived directory. Now lets start with the primary load balancer config:
sudo vi /etc/keepalived/keepalived.confKeepalived can run any kind of script to determine the health of a host, this is called a health check. A script should return 0 to indicate it is okay and anything else to indicate that the host is entering a fault state.
A simple bash script that pings Google could be a simple check, but for our case, it is more meaningful to check if a host is still running a process called haproxy every 2 seconds. Lets call our script check_haproxy:
vrrp_script check_haproxy {
    script "pidof haproxy"
    interval 2
}
Next we will define our load balancer's vrrp_instance, the crucial configuration that dictates its high availability. First we are enabling keepalived to communicate with its peers over the private interface, make the primary host the MASTER, give the initial highest advertised priority of election and assign a unique virtual ID which will be used by both hosts.
vrrp_script check_haproxy {
    script "pidof haproxy"
    interval 2
}

vrrp_instance VI_1 {
    interface eth1
    state MASTER
    priority 255
    virtual_router_id 50
}
A unicast_src_ip will be the primary load balancer's private IP while the unicast_peer will be the private IP address of the backup load balancer. If we had more load balancers, we could add more lines inside the unicast_peer:
vrrp_script check_haproxy {
    script "pidof haproxy"
    interval 2
}

vrrp_instance VI_1 {
    interface eth1
    state MASTER
    priority 255
    virtual_router_id 50

    unicast_src_ip primary-load-balancer-private-IP-address
    unicast_peer {
        backup-load-balancer-private-IP-address
    }
}
Another configuration is the authentication that ensures the communication between keepalived daemons is authentic:
vrrp_script check_haproxy {
    script "pidof haproxy"
    interval 2
}

vrrp_instance VI_1 {
    interface eth1
    state MASTER
    priority 255
    virtual_router_id 50

    unicast_src_ip primary-load-balancer-private-IP-address
    unicast_peer {
        backup-load-balancer-private-IP-address
    }

    authentication {
        auth_type PASS
        auth_pass custom-password
    }
}
To perform a health check for the instance, we need to refer to the script we defined at the top using track_script. Instead of tracking by a script we coud also track by a file using vrrp_track_file and track_file:
vrrp_script check_haproxy {
    script "pidof haproxy"
    interval 2
}

vrrp_instance VI_1 {
    interface eth1
    state MASTER
    priority 255
    virtual_router_id 50

    unicast_src_ip primary-load-balancer-private-IP-address
    unicast_peer {
        backup-load-balancer-private-IP-address
    }

    authentication {
        auth_type PASS
        auth_pass custom-password
    }

    track_script {
        check_haproxy
    }
}
Finally, we are going to add a script that triggers a response when keepalived transitions from one state to another. Available to use are notify, notify_backup and notify_master directives. To keep it simple, we are going to write an identical script for both load balancers when they are transitioning from BACKUP to MASTER. Therefore we will use notify_master and put the script within /etc/keepalived:
vrrp_script check_haproxy {
    script "pidof haproxy"
    interval 2
}

vrrp_instance VI_1 {
    interface eth1
    state MASTER
    priority 255
    virtual_router_id 50

    unicast_src_ip primary-load-balancer-private-IP-address
    unicast_peer {
        backup-load-balancer-private-IP-address
    }

    authentication {
        auth_type PASS
        auth_pass custom-password
    }

    track_script {
        check_haproxy
    }

    notify_master /etc/keepalived/master.sh
}
Secondary Load Balancer Keepalived Configuration
The other load balancer will be in the same location and identical, but we need to change some values:
state- Since we have aMASTERas the primary, the secondary will have aBACKUPstate.priority- The value should be lower than the primary, so we can set 254.unicast_src_ip- It should be the private IP address of the secondary load balancer.unicast_peer- This should have the private IP addresses of other load balancer(s)
Floating IP Transition Scripts
When a new MASTER host has transitioned, we need an automatic way for the floating IP address to be attached to this new host.
We are going to download a python script within /usr/local/bin that reassigns the floating IP address to a droplet using the DigitalOcean API:
cd /usr/local/bin && sudo curl -LO http://do.co/assign-ipBy running the following command, you will re-assign an existing floating IP, but we are not running it just yet:
python /usr/local/bin/assign-ip floating-IP-address droplet-IDDigital Ocean APIs will not run without an API token. So before running the script above, create a personal API token from your account and store it somewhere secure.
Also from your account, create a floating IP, assign it to the primary load balancer. Now we are going to write a script to that will do the re-assignment, and where's a better place than the notify_master script?
sudo vi /etc/keepalived/master.shFor all load balancers, update this script as follows:
export DO_TOKEN='your personal API token'
IP='floating IP address'
Then we are adding some variables that can be determined from the metadata API. First is the droplet ID and a boolean whether it has a floating IP assigned or not:
export DO_TOKEN='your personal API token'
IP='floating IP address'
ID=$(curl -s http://169.254.169.254/metadata/v1/id)
HAS_FLOATING_IP=$(curl -s http://169.254.169.254/metadata/v1/floating_ip/ipv4/active)
We are going to use the python script to assign the floating IP 5 times, with a 3 second interval between but stop once the assignment is successful:
export DO_TOKEN='your personal API token'
IP='floating IP address'
ID=$(curl -s http://169.254.169.254/metadata/v1/id)
HAS_FLOATING_IP=$(curl -s http://169.254.169.254/metadata/v1/floating_ip/ipv4/active)

if [ $HAS_FLOATING_IP = "false" ]; then
    n=0
    while [ $n -lt 5 ]
    do
        python /usr/local/bin/assign-ip $IP $ID && break
        n=$((n+1))
        sleep 3
    done
fi
Save the script and make it executable:
sudo chmod +x /etc/keepalived/master.shAll the setup is now complete and we can start the daemons on both load balancers:
sudo systemctl start keepalived
Join to participate in the discussion