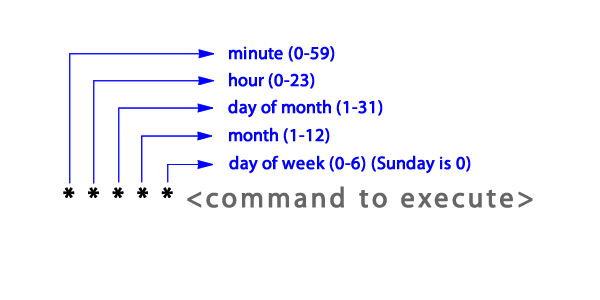
Cron is a time-based utility software that has the ability to schedule tasks. Tasks can be in the form of any programming language executable script or a program.
Today we are going to set up cron within an Ubuntu environment in order to run Laravel's task scheduler.

Update System Software
After logging in your server with a non-root sudo user, update and then upgrade the system software so that you have the lastest software that is bug free.
You may do so using the following sequence of commands:
sudo apt-get updateAccept the defaults and then after downloading the update, upgrade your software to use the update:
sudo apt-get upgradeInstall Cron
Using the package manager, you may install cron using the following command:
sudo apt-get install cronTo verify cron is installed and running:
systemctl status cronAfter seeing that it runs successfully, you may exit using (SHIFT + Z + Z)
Setup Cron Tasks
If you are the root user, you may edit the /etc/crontab file to setup tasks, but since most of us are non-root users, it is appropriate to use another alternative.
For any other user, run the crontab edit command to open the editor:
crontab -eThis will open the crontab editor for the logged in user only. Now you can write your cron task in the format of the illustration above.
Since we want to setup the Laravel scheduler, we should write the task as it is from the Laravel scheduler documentation:
* * * * * cd /path-to-your-project && php artisan schedule:run >> /dev/null 2>&1Remember to change path-to-your-project to reflect your own project path. Generally it would be something like /var/www/html...
After that save the file and exit.
Join to participate in the discussion